Tag Archives: vum

powercli

Conquering ESXi upgrades with conflicting VIBs using PowerCLI

Today, I ran into an issue where I was upgrading ESXi 6.0 servers to 6.5 Update 1 using an HPE custom ISO.   Here’s another example of how PowerCLI can make you more productive.

Conflicting VIBs problem

While working with a customer on a vSphere 6.0 to 6.5 upgrade, I prepared everything as it should be.  I got the latest custom ISO from HPE for ESXi 6.0 Update 1, created a VUM baseline, and attached it to the clusters in question.  Upon scanning the ESXi hosst with VMware Update Manager, I received a warning that the HPE custom ISO was incompatible.

esxi upgrade conflicting vibs

Note that there aren’t actually four conflicting VIBS.  It repeated the problematic modules twice.  There’s actually only two.

Basically, these conflicting modules should be removed prior to upgrading the ESXi hosts.

Removing conflicting VIBs the manual way

There’s nothing special about how to remove them via ESXCLI.  You need the name of the conflicting module, and enable SSH on the ESXi hosts.  Then, run the following command:

esxcli software vib remove –vibname conflicting-vib-name

In the case above, they are named scsi-qla2xxx and scsi-lpfc820.

Watch for indications if the server needs to be rebooted when you run the command.  If so, reboot the servers before proceeding with the upgrade.

Removing conflicting VIBs the PowerCLI way

It’s even easier with PowerCLI to remove these conflicting VIBs.  You don’t have to enable SSH on all your ESXi hosts.  First, make a text file with the names of each conflicting VIB name, with one name per line.

Next, run the following commands after connecting to your vCenter server via PowerCLI:

$modules = gc c:\scripts\modulesnames.txt
$modules
scsi-qla2xxx
scsi-lpfc820

$esxi = get-vmhost "esxihost.domain.com"
$esxcli = get-esxcli -V2 -VMhost $esxi
$modules | foreach-object{$esxcli.software.vib.remove.Invoke(@{"vibname" = "$_"})}

You could obviously make a variable of all your ESXi hosts and do them all at once, but you might not want to leave your ESXi hosts sitting there waiting for a reboot for a while.  It’s your call how to handle that part, but this is how you can remove conflicting VIBs at a basic level.

Hope this helps!

VMware Update Manager HP Vibsdepot Change

I posted last year about how to get HP specific updates related to VMware through VMware Update Manager.  A co-worker of mine recently pointed that URL is incorrect now.  HP recently rebranded their enterprise products as HP Enterprise (HPE).  Consequently, the VIBS download locations changed.

New HP VUM URLs

Drivers: http://vibsdepot.hpe.com/index-drv.xml

All other components: http://vibsdepot.hpe.com/index.xml

To get all HP updates, you need to add both as download locations.

Make sure you update your environment accordingly!

Auto download/install Dell/HP updates with VUM

Recently, I had a customer run into an issue with a bug in the HP agents included within their co-branded installation media, so I came to realize the importance of updating server vendor custom software.

http://kb.vmware.com/kb/2085618

I decided to look into how to manage updating those a little easier since I’m having to update this kind of thing for customers lately. It turns out with Dell and HP, it’s not tough. (And BTW, Cisco and IBM – come on and get with the times on this!)

Did you know you can add a Dell and/or HP download repository for VUM to check for these updates for you? I knew you could, but I’ve never done it until now since we typically have customers maintain their stuff, but I’m involved in a few customers who want me to do it for whatever reason. And hey, I’m lazy, so screw doing this the hard way.

Here’s how:
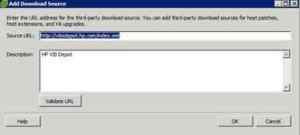
Open the full vSphere Client with the VUM plugin installed and enabled. Open the Update Manager management section. Click on the Configuration tab -> Download Settings. Then, click on Add Download Source.

vumadddownloadsource

Next, enter the source URL for your server manufacturer:

Dell: http://vmwaredepot.dell.com/index.xml

HP: http://vibsdepot.hp.com/index.xml

Edit:  HP’s download locations have changed!  Use:

Drivers: http://vibsdepot.hpe.com/index-drv.xml

All other components: http://vibsdepot.hpe.com/index.xml

Enter a description like “HP VIB Depot”.  Click on Validate URL to ensure that’s good, and OK.vumdownloadsource

Boom, take a look and make sure the connectivity status is Connected, and you can click Download Now if you want to get the latest updates from them immediately.

Now you need to make a baseline that includes the patches, and you can make a dynamic baseline to automatically update with the latest ones.  Go to the baselines tab, create a baseline, name it something with the software vendor name and ESXi version and select the Host Patch type.  For Patch Options, select Dynamic.  For criteria, select the server vendor, and the specific version of ESXi you’re updating.  Note, this baseline will only work for a specific major version of ESXi.  If you don’t select a version to include all version patches, you’ll get errors when you remediate.vumbaselinecriteria

Next, you can select any patch to exclude anything you don’t want installed.  Newer versions supersede the older ones, so there’s no need to exclude anything unless the latest version you know causes problems.vumbaselineexclusions


There probably isn’t a reason to add additional Updates manually to this baseline.  If you need to add other patches, make another baseline for that, and include everything you want in a baseline group.vumaddadditionalpatches


Now add the new baseline to the appropriate Baseline groups as needed, scan and remediate, and you’re off to the races.

How cool is that?