Monthly Archives: July 2015

Howto: Fix vCenter 5.5 Syslog Collector bug

I just ran into an issue for a customer that is running vCenter 5.5.  Apparently, there is a known issue with the 5.5 version of the syslog collector that causes the debug log to grow indefinitely when it was upgraded  to 5.5 according to the article.  However, the customer in question was built fresh with 5.5, although I did update within 5.5 to newer builds during that time.  Bottom line is it should be checked if they’re running 5.5 version of the syslog collector in all cases to be sure.  The KB article outlines steps to stop this, which basically involves turning off debug logging altogether.

The debug log doesn’t contain actual syslog info for hosts, so this log file is only useful for troubleshooting issues with the syslog collector itself, so it’s almost certainly safe to delete.

Please note this only impacts the syslog collector.  If you did not install the syslog collector, this isn’t applicable.

You can copy and paste the following into an admin elevated PowerShell window to automate stopping the syslog service, changing the config file for the syslog collector to turn off debug logging completely, delete the probably massive debug log, and start the syslog collector again.  You can also save it as a .ps1 file and run it in an elevated prompt as well.

stop-service vmware-syslog-collector
(get-content "C:\ProgramData\VMware\VMware Syslog Collector\vmconfig-syslog.xml") | foreach-object {$_ -replace "<level>1</level>", "<level>0</level>"} | set-content "C:\ProgramData\VMware\VMware Syslog Collector\vmconfig-syslog.xml"
remove-item "C:\ProgramData\VMware\VMware Syslog Collector\logs\debug.log"
start-service vmware-syslog-collector

This assumes of course the syslog collector is running on a Windows machine, not the vCenter Appliance.  The article doesn’t seem to make clear if this issue only applies to the Windows version of Vcenter, and how to fix the vCenter Appliance if the issue did impact it as well.

Hope this helps!

NDMP isn’t always a slam dunk

Hey everyone,

I recently did some work with a customer who deployed a VNXe to act initially as a file server for quite a bit of file data.  They were using Unitrends to backup their Hyper-V VMs, and for application level backups and physical machines.  Before deploying the VNXe to serve up CIFS data, they ran a Windows file server, which Unitrends could simply backup by deploying an agent into the OS, and all was well.

The customer asked me how to go about backing up the VNXe, especially with Unitrends, because they didn’t want to switch backup products or deploy an entirely new backup solution just for the VNXe.  My initial response was that NDMP is the best way to go for backups if that is an option with your backup product.

However, I did some research, and found that NDMP isn’t always the best thing to use.  In this case, check out Unitrends’ limitations when using NDMP.   The fact that you can’t restore your backups to anything but a VNXe, and you can’t granularly recover out of an NDMP backup would be very serious deal breakers for a lot of companies.

So check your NDMP backup vendor and storage array for what is supported, and make sure it’s what you want to use for backing it up.  You may actually prefer using CIFS mounts within a server, and back the server up to get the file data.

VMworld – What I’m looking forward to

Almost every year, I go to VMworld to learn about all things new and coming down the pike, learn about products related to virtualization, and to network with colleagues.

This year is no different.  I’m a VMworld alumni, having attended in 2009, 2011, 2012, and 2014.  VMworld is a great time to catch up on everything and with everyone in the community.

My wife travels with me usually when I go.  If you have someone travelling with you, but isn’t attending the conference, I highly recommend checking out Spousetivities.  Put together by Crystal Lowe, these are activities created for people to attend while people they are travelling with attend the conference.  Crystal does a fantastic job coming up with things to do, and it’s a great way to have fun and meet new people.

This year, we were able to also find an Alaskan cruise leaving from San Francisco and arrives back in San Francisco on the morning when VMworld technically starts.  Really looking forward to that!

Back to VMworld, the things I always look forward to are the hands on labs, the Solutions Exchange, and sessions.  If you’re not familiar with VMworld, the hands on labs allow you to bring your own device or use their setup terminals (usually what I do because I’m not wanting to bring my laptop to carry around all day, and I find using an iPad frustrating for labs), and get hands on experience with new VMware and other partners’ products and features.  It’s great!

Solutions Exchange is basically a vendor expo where you can learn about various vendors and their solutions that are related to virtualization.  I don’t know how many times I’ve discovered new products or solutions that solved problems for customers here.

And the sessions… SO MANY AWESOME SESSIONS!  I can’t fit them all in!  Here are a few sessions I’m looking forward to.

SDDC6683-SPO – Getting Ready for the Next Wave of IT Convergence with Cisco UCS – SyCom does a lot of work with Cisco including UCS, so I need to keep up to speed with what’s new with that line of products.

STO5605 – What’s New in Site Recovery Manager – I’ve done many Site Recovery Manager engagements.  It’s normally easy to find what new features are in the next version, but what I like about these sessions is they often give you interesting perspectives on how to use these features properly, or in a creative manner.

STO6556-GD – Stretched Clusters with Lee Dilworth – I’ve recently deployed a stretched vSphere cluster in version 5.5, so I take personal interest in this topic.  It’s good to hear how others are doing it, and pick up on any tips.

STO5822 – Putting Virtual Volumes to Work – Storage Best Practices for vSphere 6 and Beyond – I think vVols are a big new feature in vSphere 6.  But I also know that they won’t always be the best solution for all customers and/or for all workloads.  I love sessions like this because, while I think I already have a good grasp about the topic, I always learn some new things to think about.

ELW-SDC-1630 – Cloud Native Apps Workshop – If you think all workloads are basically the same, have basically the same thresholds for performance, etc., you’re wrong.  I came from working with the storage I/O hog that was Exchange 2003, where you needed pretty low storage latency.  But cloud native apps generally can accept very high latency.  This is just one example of how cloud native apps can differ radically from the workloads you typically see, and I want to know more.

SDDC4595 – Ask the Expert Industry Titans – A mainstay tradition for sessions.  It’s Chad Sakac and Vaughn Stewart, plus others, answering any questions that are brought to the floor.  It’s going to be a blast.

SDDC6642 – The Bleeding Edge: A Face-melting Technical Smorgasbord of Private, Hybrid and PaaS – It’s Chad Sakac talking about cool new stuff.  Plus, face-melting is in the freakin’ session title!  Do I really need to say more?

INF4529 – VMware Certificate Management for Mere Mortals – Let’s face it, certificate management in vSphere hasn’t exactly been completely easy.  Since there’s new tools to manage them, I wanted to get caught up to speed.

NET4976 – vSphere Distributed Switch 6.0 – Technical Deep Dive – Always a great session if it’s Jason Nash and Chris Wahl.

What sessions are you looking forward to?

What’s in the bag?!

Greetings!

If you’ve read in my About page, you know that I’m a consultant.  I have to travel often to customer’s sites to do anything from general configuration and troubleshooting where I don’t physically touch any equipment (increasingly, the datacenter that holds what I’m working on isn’t even in the same building, city, state, or even country), to full on racking and stacking equipment.  Some things I never want to be without, some things I always want with me when I’m racking equipment, and then there are things I want in my car just in case, but I seldom need.

I also have two bad disks in my neck, so I don’t want to carry more than I need, so I really had to come up with a modular way to pack for whatever work I may be doing.

This post is lay the groundwork for how I manage this in a category of posts I’m calling “WhatsInTheBag.”  I’m also going to maintain a page of current contents as well, so you can easily see what I’m carrying.  Obviously, the contents will change. I might find something that fits my needs better by accomplishing the task better, or maybe it accomplishes multiple tasks acceptably better than several individual items.  I have to carry enough stuff, so I’m constantly looking for ways to conserve weight while still being able to get the job done.

But just so you know, here’s how I organize at a high level.  I have three basic containers for my work to carry stuff in:

  • Laptop bag – this carries everything I always want with me when I go onsite for that work.  Most everything it it doesn’t change.  My next post in this series is what bag I use for this, as many people in IT discuss the perfect laptop bag for them.
  • Racking bag – this carries everything I want with me when I’m racking equipment that I pretty much always will need, or would never even want to start racking equipment unless I have it, because if I don’t have it, I’m either screwed or I won’t be happy with the quality of the job.  Currently, I’m using a medium toolbag for this, but I’m considering alternatives for it.
  • Toolbox – Stuff I generally don’t need for either of the above to carry into wherever I’m working, but I want it in my car in case I need it.  Currently, it’s an old Black and Decker toolbox my wife bought me 15 years ago when I did PC type builds and repair for side money on top of networking, but I’m considering replacing it once I find the right thing.

In the meantime, what do you use to carry your everyday must have items?  How do you organize to carry only what you need?

New gadget – RAVPower Filehub wireless NAS

Just got in a pretty cool little gadget that has quite a few practical uses you guys might be interested in.

RAVPower FileHub in White

RAVPower FileHub in Black

This RAVPower device is about the size roughly of a Western Digital My Passport hard drive, (slightly longer, about 33% thinner), pretty darn light, has an SD card slot, a full size USB port for connecting any kind of USB storage to it (pen drives, or even a portable hard drive, which can even be powered from this RAVPower device like a Western Digital My Passport drive).

Basically, any storage device or SD card you plug in gets served up as a file share via wifi.  You can plug both an SD card and USB storage device simultaneously as well, providing access to both.  You can access it like a CIFS share, via web portal, and also via a RavPower Filehub app freely available for IOS and Android.  Up to 5 concurrent sessions are supported.  The app also allows data management such as file copy between devices and folders, moves, and deletions.

For wifi access, you can connect this to a wifi network (b/g/n wifi support with WPA/WPA2 PSK or open), or it can do its own wifi network you can connect to instead if you need to access the data but cannot connect to an external wifi network, but this of course knocks you off the internet.  If it has connectivity to a wifi network you saved in its config, it’ll connect to that automatically, but the isolated network is always up, ready to go.

Another handy feature is the web portal via an IOS device can open up video files to stream unprotected content, I would assume android devices could use this or another method.  I can’t seem to get any protected files to playback though from it via IOS.

Finally, you can connect this to your computer via USB, power it off, and it becomes a regular SD card reader.

Lots of useful scenarios with this…

· Move/backup data on camera SD card by inserting the camera’s SD card into it, and your choice of USB storage (device itself has a single SD card slot, keep that in mind) – I did try to hook my wife’s Fujifilm camera up to it via the USB port, but it didn’t recognize the camera’s inserted SD card unfortunately, so pretty good chance you’d need a USB hard drive or stick as the copy location.  It does claim that many cameras would work in this manner, though.
· Share data with multiple people quickly instead of doing the ol’ USB stick pass along (5 people can connect at once)
· Afraid to go to a meeting with just a tablet or smartphone in case you need to get some data from someone who might have data on a USB stick, or need to give them data?  Use the app to copy to/from USB stick and the SD card within the device or vice versa.  Or they can connect to it wirelessly and dump the data.
· External unprotected movie/music/reading material repository for your family on a road trip

It also serves as a 3000mAh phone power bank for emergency power, and is powered/charged via USB, so you can keep it powered in the car for that road trip with a simple micro-USB car charger, or power it via another power bank if you’re camping or something.

Easy to use (web portal for heavier management, firmware updates, etc), lots of flexibility.

About the only thing I don’t like?  You must authenticate with the admin account of the device to access the CIFS share; there’s no way natively I can tell to create limited users who have say read only rights, or even file share access rights.  And admin has full rights, so don’t put your only copy of data on the thing, and might be smart to virus scan it when you’re done sharing it with other people.  I even tried to Putty into it to see if I could create new accounts that way, and no dice, so I’d probably have to root it (no thanks).

Fix AD Lingering Objects with PowerShell

I briefly ran a blog before on wordpress.com, and most of the information there is outdated, or probably not relevant today, but there are a few posts that I’ve found little else on the internet to address.  These typically harken back to my AD/Exchange heavy days, but they’re still relevant today.  One of those posts is how to fix Active Directory lingering objects using PowerShell.

I ran into a problem in a large forest with multiple child domains and lots of domain controllers – 10 domains and 275 domain controllers!

To protect identities, let’s assume a forest consisted of domain.com, with two child domains – child1.domain.com and child2.domain.com.  Each domain has 2 global catalog servers (gc1, gc2), and one domain controller that is not a global catalog (dc1).

What are lingering objects anyway?

Remember that at least one domain controller in each domain must be a global catalog server.  GC’s have a copy of all objects in the forest, but only a subset of each object’s properties is found in AD.  For all objects in a GC that are not in that domain controller’s domain, the GC has a read-only copy.  You cannot manually go in and alter, create, or delete objects directly in the Global Catalog for objects that reside in another domain.

Lingering objects occur when through a variety of ways, a global catalog in one domain ends up with objects that no longer exist in another domain.  For example, let’s say a user exists in child2.domain.com and is deleted.  If somehow this doesn’t replicate to a GC in child1.domain.com or domain.com, the global catalogs in domain.com and child1.domain.com now have that user as a lingering object.  This can occur through a variety of ways, such as replication failures, or a global catalog server was disconnected for a long period of time.

Further info can be found here.

To find if you have lingering objects on a domain controller, you must run the following command:

repadmin /removelingeringobjects ServerName ServerGUID DirectoryPartition /advisory_mode

Simply remove the /advisory_mode switch to remove lingering objects.

ServerName is the fully qualified domain name of a global catalog that has lingering objects.  ServerGUID is a domain controller’s GUID from the domain that the lingering object is from, and you’d like to use it as a reference.  DirectoryPartition is the distinguished name of the GC partition with the lingering object.  Usually, lingering objects are computer or user account objects, so this would look like dc=domain,dc=com.
Finding the DC’s GUID can be done by looking in the forward lookup zone _msdcs.domain.com.

Lingering objects can cause problems with outdated or invalid group membership, problems with address book generation with Exchange, or basically problems with anything that depends upon valid info within the global catalog.  It can even cause replication failures depending upon your global catalog replication topology, and if you have strict replication enabled.

Scenario
Let’s say you suspect gc1.child1.domain.com has lingering objects from child2.domain.com.  You would first need a GUID of a DC in child2.domain.com that you believe has accurate domain information.  Let’s say you believe that dc is GC2.child2.domain.com.  Use the DNS MMC, connect to a DNS server hosting domain.com, look in the _msdcs.domain.com zone, and you will see all domain controllers in your forest.  Copy the GUID to your clipboard.  Let’s say GC2.child2.domain.com’s GUID is:

85d158d2-a006-4fff-b1e5-f9b6eaabab2b

You would then run:
repadmin /removelingeringobjects gc1.child1.domain.com 85d158d2-a006-4fff-b1e5-f9b6eaabab2b dc=child2,dc=domain,dc=com /advisory_mode

Note you need the Windows Support Tools installed.

This isn’t so tough.

However, if you suspected all your global catalogs had lingering objects for this domain, you’d need to run this command for each GC not in child2.domain.com.  Not terrible for this small of an environment.  To fix them, just chop off the advisory mode switch, and you’re done.

Think Big!

What if your environment was a 10 domain forest with over 100 domain controllers, and no predictable pattern of which domain controllers were global catalogs and which weren’t?!  Even if you knew which were global catalogs, who wants to issue that many commands?!

Wouldn’t it be nice is if we could issue this command to every global catalog not in child2.domain.com (since their GC’s have writable copies of the partition, theirs would be correct and would fix lingering objects on their own)?

That is what I faced.  I found replication wasn’t occuring for a domain partition in the global catalog because strict replication was enabled, and all global catalogs outside of a particular domain had lingering objects.  Talk about a pain in the butt!  Unless of course…
PowerShell to the rescue!

We can easily get all the global catalogs in the forest:
$forest = [system.directoryservices.activedirectory.Forest]::GetCurrentForest()
$forest.globalcatalogs | select-object name

You would receive output of the fully qualified domain names of all global catalogs.
But wait.  We only want GC’s that are NOT in child2.domain.com.  Simple enough with a where-object filter.

$forest.globalcatalogs | where-object {$_.name -notlike “*.child2.domain.com”} | select-object name

Now we just need to set this to a variable, so we add “$gcs = “ to the beginning of the second line.  This will allow us to have an array we can then perform an action or command on.  The last part is a bit tricky because we’re intermixing PowerShell with a standard command line.  Usually, you need to use the ‘ character around phrases.  Also, in this case, we’ve actually grabbed objects within the $gcs variable, so we want to make sure we’re not passing any other properties or code associated to objects.  We literally just want the name of each to be passed.  Remember, $_ means every object in the pipeline.  By adding .name, we’re saying don’t pass any other output related to each object in the array other than it’s name.  Without it, you get errors because PowerShell is putting extra characters in for each Global Catalog.

Final commands:

$forest = [system.directoryservices.activedirectory.Forest]::GetCurrentForest()
$gcs = $forest.globalcatalogs | where-object {$_.name -notlike "*.child2.domain.com"} | select-object name
$gcs | foreach-object {repadmin /removelingeringobjects $_.name 85d158d2-a006-4fff-b1e5-f

VMware dedicated swapfile datastores

Dedicated swapfile datastores in VMware are often overlooked.   Here’s why you might use them, and how to size them easily with PowerCLI.

It’s very often advisable to create dedicated swapfile datastores in your VMware vSphere environment.   There are numerous benefits:

  • Ensure there’s room to start a VM
  • Use different storage type than what the working directory uses for performance or cost savings
  • Reduce replication traffic when using storage based replication, because there’s no reason to replicate this storage
  • You may want to snapshot storage that runs VMs for easy recoverability, but there’s no reason to snapshot swapfile

If you decide to create dedicated datastores, you want to use the following principles:

  • Create datastores that are resilient, so that VMs can be started
  • Have hosts that frequently have VMs VMotion between them, such as a cluster, use the same datastores to reduce vMotion network traffic
  • Carefully monitor their space, and size them correctly, and allow for some overhead for growth.

The swapfile size for each VM is determined by the following:

  • The VM’s defined RAM minus the RAM reservation for that VM.

For example, if a VM is defined as having 8GBs, but the reservation for RAM is set for 2GBs, a 6GB swapfile will be created.  By default, a VM has no reservation for RAM.

That means that this datastore space consumption can fluctuate as VMs are built, powered off and on, whenever RAM is added or removed from a VMs definintion, or if its memory reservation is adjusted.

This begs the question – How do you easily size for these datastores easily?  Harnass PowerShell by using PowerCLI!  Simply tune the $vms variable portion or what’s piping to it of the following to grab the VMs that will likely VMotion between the same hosts.  This would usually be by cluster.

$vms = get-cluster clustername | get-vm
$RAMDef = $vms | Measure-Object -Sum memoryGB | select-object sum -expand sum
$RAMResSum = $vms | get-VMResourceConfiguration | measure-object -sum memreservationGB | select-object sum -expand sum
$SwapDatastore = $RamDef - $RamResSum
Write-Host "Defined amount of RAM within VMs is $RAMDef GBs"
Write-Host "Memory reservation for VMs is $RamResSum GBs"
Write-Host "A datastore of at least $SwapDatastore GBs will be needed, plus overhead."

Output will look like this:

Defined amount of RAM within VMs is 218 GBs
Memory reservation for VMs is 0 GBs
A datastore of at least 218 GBs will be needed, plus overhead.

For overhead, you want to keep at least 25% free probably minimum just to keep datastore free space alarms from going off, plus any additional growth from the factors outlined above, mostly centered around new VMs being built.

Many customers balk when told how big the swapfile datastore will be, but you have to remember if you’re changing this within a customer’s environment, they’re going to gain back swapfile space within their existing datastores as swapfiles get placed on the dedicated datastore.

Also, think of the potential storage space savings you could get if you are storage snapshotting your VM datastores, and replicating, plus the bandwidth savings.  Let’s say you have VMs that in aggregate are defined with 500GBs of RAM with no memory reservation.  If you’re doing both snapshots and replication and didn’t dedicate a datastore to the swapfiles, you’re talking savings of 500GBs of replication space, and up to 1TB worth of space savings alone depending upon how much additional space the swapfiles are taking within your storage snapshots.  Pretty worth it!

How do you migrate existing swapfiles?

  1. First, set your cluster to use the host’s swapfile setting instead of the cluster’s.
  2. Set all your hosts to use the same datastore.

To do this in PowerCLI:

$cluster = "clustername"
$swapfiledatastore = "swapfiledatastorename"
get-cluster $cluster | set-cluster -VMSwapfilePolicy InHostDataStore

You’ll have to manually set the host’s cluster datastore with the web or thick client.  PowerCLI fails to set the heartbeat datastore if the host is in a cluster unfortunately.

You should see the swapfiles deleted from the VMs’ working directories and created in the new datastore as VMs are power cycled.

Auto download/install Dell/HP updates with VUM

Recently, I had a customer run into an issue with a bug in the HP agents included within their co-branded installation media, so I came to realize the importance of updating server vendor custom software.

http://kb.vmware.com/kb/2085618

I decided to look into how to manage updating those a little easier since I’m having to update this kind of thing for customers lately. It turns out with Dell and HP, it’s not tough. (And BTW, Cisco and IBM – come on and get with the times on this!)

Did you know you can add a Dell and/or HP download repository for VUM to check for these updates for you? I knew you could, but I’ve never done it until now since we typically have customers maintain their stuff, but I’m involved in a few customers who want me to do it for whatever reason. And hey, I’m lazy, so screw doing this the hard way.

Here’s how:
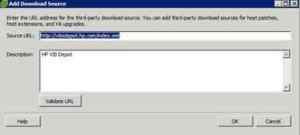
Open the full vSphere Client with the VUM plugin installed and enabled. Open the Update Manager management section. Click on the Configuration tab -> Download Settings. Then, click on Add Download Source.

vumadddownloadsource

Next, enter the source URL for your server manufacturer:

Dell: http://vmwaredepot.dell.com/index.xml

HP: http://vibsdepot.hp.com/index.xml

Edit:  HP’s download locations have changed!  Use:

Drivers: http://vibsdepot.hpe.com/index-drv.xml

All other components: http://vibsdepot.hpe.com/index.xml

Enter a description like “HP VIB Depot”.  Click on Validate URL to ensure that’s good, and OK.vumdownloadsource

Boom, take a look and make sure the connectivity status is Connected, and you can click Download Now if you want to get the latest updates from them immediately.

Now you need to make a baseline that includes the patches, and you can make a dynamic baseline to automatically update with the latest ones.  Go to the baselines tab, create a baseline, name it something with the software vendor name and ESXi version and select the Host Patch type.  For Patch Options, select Dynamic.  For criteria, select the server vendor, and the specific version of ESXi you’re updating.  Note, this baseline will only work for a specific major version of ESXi.  If you don’t select a version to include all version patches, you’ll get errors when you remediate.vumbaselinecriteria

Next, you can select any patch to exclude anything you don’t want installed.  Newer versions supersede the older ones, so there’s no need to exclude anything unless the latest version you know causes problems.vumbaselineexclusions


There probably isn’t a reason to add additional Updates manually to this baseline.  If you need to add other patches, make another baseline for that, and include everything you want in a baseline group.vumaddadditionalpatches


Now add the new baseline to the appropriate Baseline groups as needed, scan and remediate, and you’re off to the races.

How cool is that?